
When we have an application that need to create an object which has to be constructed using many different objects, we find our client code cluttered with the details of the various Part objects that needs to be assembled together to create the resulting object.
To illustrate on above point let us take an example of mobile phone manufacturing system. Lets assume that we have a system installed at one of the mobile phone vendors. Now the manufacturer may decide to create a phone based on parameters like Touchscreen, Operating System, Battery and Stylus. Now if we have the objects for all these parts then creation of product with any combination of above parts would lead to a very complex and unmanageable code in the client application i.e. the module that will decide what kind of phone needs to be built.
Builder pattern is meant to solve such problems. GoF defines Builder pattern as:
Separate the construction of a complex object from its representation so that the same construction process can create different representations.
What this means is that we will have to design the system in such a way that the client application will simply specify the parameters that should be used to create the complex object and the builder will take care of building the complex object. Let us visualize the class diagram of Builder Pattern.
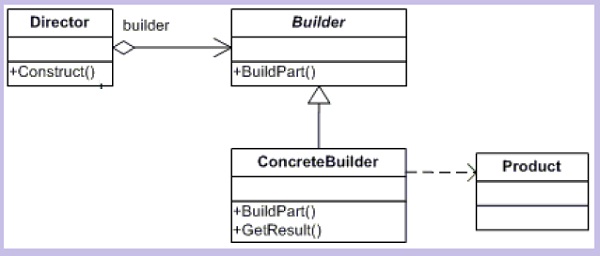
Now lets see what each class in the above class diagram is meant for
ConcreteBuilder: Concrete classes that will create the complex Product. this will keep track of what Product it has created i.e. assembled what parts and this will be used by the client to get the Product object.Builder: This is the interface for creating the actual productsDirector: This is the Client code that will specify the parts needs to be put tegether to to create the actual concrete Product.Product: This is the object that will be created by assembling many parts.
Using the code
Let us now follow the same lines as defined in the builder pattern and try to implement a basic builder pattern by solving the similar mobile phone manufacturer problem that we discussed earlier.
Let us start by having the mechanism to specify the Parts in place. Let us simple define some enums for each part so that we can create a Product by assembling the various part types
Hide Copy Code
// Some helper enums to identify various parts
public enum ScreenType
{
    ScreenType_TOUCH_CAPACITIVE,
    ScreenType_TOUCH_RESISTIVE,
    ScreenType_NON_TOUCH
};

public enum Battery
{
    MAH_1000,
    MAH_1500,
    MAH_2000
};

public enum OperatingSystem
{
    ANDROID,
    WINDOWS_MOBILE,
    WINDOWS_PHONE,
    SYMBIAN
};

public enum Stylus
{
    YES,
    NO
};
Now let us look the the
Product class. We need to have a Product that can be created by assembling there parts so lets have a class called MobilePhone which will be the Product class for us.
Hide Shrink  Copy Code
// This is the "Product" class
class MobilePhone
{
    // fields to hold the part type
    string phoneName;
    ScreenType phoneScreen;
    Battery phoneBattery;
    OperatingSystem phoneOS;
    Stylus phoneStylus;

    public MobilePhone(string name)
    {
        phoneName = name;
    }

    // Public properties to access phone parts

    public string PhoneName
    {
        get { return phoneName; }
    }

    public ScreenType PhoneScreen
    {
        get { return phoneScreen; }
        set { phoneScreen = value; }
    }

    public Battery PhoneBattery
    {
        get { return phoneBattery; }
        set { phoneBattery = value; }
    }

    public OperatingSystem PhoneOS
    {
        get { return phoneOS; }
        set { phoneOS = value; }
    }

    public Stylus PhoneStylus
    {
        get { return phoneStylus; }
        set { phoneStylus = value; }
    }

    // Methiod to display phone details in our own representation
    public override string ToString()
    {
        return string.Format("Name: {0}\nScreen: {1}\nBattery {2}\nOS: {3}\nStylus: {4}",
            PhoneName, PhoneScreen, PhoneBattery, PhoneOS, PhoneStylus);
    }
}
Now since we have the
Product class ready with us lets work on creating the Builder. The Builder should provide the functions for creating each of the parts for any phone. So let us create an interface for Builder as IPhoneBuilder and look at it.
Hide Copy Code
// This is the "Builder" class
interface IPhoneBuilder
{
    void BuildScreen();
    void BuildBattery();
    void BuildOS();
    void BuildStylus();
    MobilePhone Phone { get;}
}
Now we have the
Builder interface ready, the next thing would be to have the ConcreteBuilder objects in place. Let us assume that the manufacturer is planning for an Android phone and one Windows Phone so we will be needing two ConcreteBuilder for these phones i.e. AndroidPhoneBuilder and WindowsPhoneBuilder. Inside these builders we can specify the type of parts we want to use for each phone.
Hide Shrink Copy Code
// This is the "ConcreteBuilder" class
class AndroidPhoneBuilder : IPhoneBuilder
{
    MobilePhone phone;

    public AndroidPhoneBuilder()
    {
        phone = new MobilePhone("Android Phone");
    }

    #region IPhoneBuilder Members

    public void BuildScreen()
    {
        phone.PhoneScreen = ScreenType.ScreenType_TOUCH_RESISTIVE;
    }

    public void BuildBattery()
    {
        phone.PhoneBattery = Battery.MAH_1500;
    }

    public void BuildOS()
    {
        phone.PhoneOS = OperatingSystem.ANDROID;
    }

    public void BuildStylus()
    {
        phone.PhoneStylus = Stylus.YES;
    }

    // GetResult Method which will return the actual phone
    public MobilePhone Phone
    {
        get { return phone; }
    }

    #endregion
}

// This is the "ConcreteBuilder" class
class WindowsPhoneBuilder : IPhoneBuilder
{
    MobilePhone phone;

    public WindowsPhoneBuilder()
    {
        phone = new MobilePhone("Windows Phone");
    }

    #region IPhoneBuilder Members

    public void BuildScreen()
    {
        phone.PhoneScreen = ScreenType.ScreenType_TOUCH_CAPACITIVE;
    }

    public void BuildBattery()
    {
        phone.PhoneBattery = Battery.MAH_2000;
    }

    public void BuildOS()
    {
        phone.PhoneOS = OperatingSystem.WINDOWS_PHONE;
    }

    public void BuildStylus()
    {
        phone.PhoneStylus = Stylus.NO;
    }

    // GetResult Method which will return the actual phone
    public MobilePhone Phone
    {
        get { return phone; }
    }

    #endregion
}
And finally lets have the
Director class. Lets create a Director class that will have the Construct method accepting an IPhoneBuilder and then calling the respective functions of the ConcreteBuilders internally.
Hide Copy Code
// This is the "Director" class
class Manufacturer
{
    public void Construct(IPhoneBuilder phoneBuilder)
    {
        phoneBuilder.BuildBattery();
        phoneBuilder.BuildOS();
        phoneBuilder.BuildScreen();
        phoneBuilder.BuildStylus();
    }
}
Now we have wrapped around the functionality of building complex
Products in form of Builder Design Pattern. Now when we look at the client code we can see how clean it is to create any product.
Hide Copy Code
class Program
{
    static void Main(string[] args)
    {
        // Lets create the Director first
        Manufacturer newManufacturer = new Manufacturer();
        // Lets have the Builder class ready
        IPhoneBuilder phoneBuilder = null;

        // Now let us create an android phone
        phoneBuilder = new AndroidPhoneBuilder();
        newManufacturer.Construct(phoneBuilder);
        Console.WriteLine("A new Phone built:\n\n{0}", phoneBuilder.Phone.ToString());

        // Now let us create a Windows Phone
        phoneBuilder = new WindowsPhoneBuilder();
        newManufacturer.Construct(phoneBuilder);
        Console.WriteLine("A new Phone built:\n\n{0}", phoneBuilder.Phone.ToString());
    }
}
Now if we need to create more
Products only a ConcreteBuilder would be needed and rest all the codebase will remain the same. The client code can also create complex Products easily with this pattern in place. Lets look at the output of our program.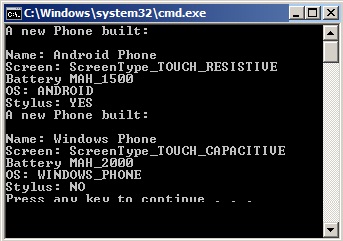
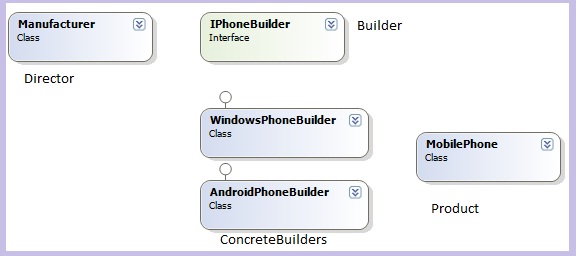
Before wrapping up let is look at the class diagram of our application and compare it with the class diagram of Builder Pattern.
No comments:
Post a Comment