Saturday 25 November 2017

Cannot create KDS Root Key - “Request is not supported”

When trying to run the powershell command Add-KDSRootKey –EffectiveImmediately you get the error "Request is not supported" if the powershell console isn't running elevated as administrator.

Just right click on the powershell icon and run as administrator and rerun the command.

Add-KdsRootKey –EffectiveTime (Get-Date).AddHours(-10)

Windows OS Activation's keys

Client Configuration

Client in this case refers to any Microsoft operating system using volume activation and a KMS key, servers as well as desktop versions.
All configuration is done via a VB script (slmgr.vbs) which is installed by default on all Windows systems capable of using KMS. It is located in the Windows\system32 directory. You must use a command shell run with administrator privilages.

General Prerequisites

You need to ensure that you can communicate via TCP port 1688 to our KMS servers.
Right click on a command shell and select Run as Administrator before entering the commands.

Change the SID

Before imaging a system for use with KMS you must generate a unique SID. If you are doing a clean install from media you will get a unique SID. If you're planning on imaging systems you can use sysprep with the generalise option, the Windows Automated Installation Kit or join the system to a domain.
Once you have done this you can configure the system to use KMS for activation.

Configuration Steps

  • Set the KMS server (slmgr -skms servername)
  • Install the KMS Product Key (slmgr -ipk product key)
  • Activate the system (slmgr -ato)

Set the KMS Server (slmgr -skms servername)

You need to configure your client to point to the KMS server. By default it will try and autodetect an activation server using DNS and SRV records, based on the DNS domain suffix of the client. Since these records would not match in the majority of cases this is not a viable method so direct registration of the KMS server is the supported method.
The server name is kms.csx.private.cam.ac.uk.
You should use the FQDN to identify the KMS system rather than the IP address or NetBIOS name.
To configure the client for direct registration launch a command window with elevated privileges and enter:
 \windows\system32\slmgr.vbs -skms kms.csx.private.cam.ac.uk
This will override any attempt by the client to use autodiscovery and point the system to the central KMS server.

Install the KMS Product Key (slmgr -ipk product key)

On Windows Vista, server 2003, 2003 R2 and 2008 the product key can be found in a pid.txt file in the \Sources folder on the install media. Windows 7, 8 and 8.1 and Server 2008 R2, 2012 and 2012 R2 product keys can be found below. This may cause an error message, see Troubleshooting below.
To install a product key use slmgr.vbs
\windows\system32\slmgr.vbs -ipk Product Key
If a pre-existing key is present you may need to use the -upk option to remove this before you can install the pid key.

Windows 7, 8, 8.1, Server 2008 R2, Server 2012,Server 2012 R2 and Server 2016 use the following keys for KMS activation;

Operating System Edition
Product Key
Windows 8.1

Windows 8.1 Professional
GCRJD-8NW9H-F2CDX-CCM8D-9D6T9
Windows 8.1 Professional N
HMCNV-VVBFX-7HMBH-CTY9B-B4FXY
Windows 8.1 Enterprise
MHF9N-XY6XB-WVXMC-BTDCT-MKKG7
Windows 8.1 Enterprise N
TT4HM-HN7YT-62K67-RGRQJ-JFFXW
Windows 8

Windows 8 Professional
NG4HW-VH26C-733KW-K6F98-J8CK4
Windows 8 Professional N
XCVCF-2NXM9-723PB-MHCB7-2RYQQ
Windows 8 Enterprise
32JNW-9KQ84-P47T8-D8GGY-CWCK7
Windows 8 Enterprise N
JMNMF-RHW7P-DMY6X-RF3DR-X2BQT
Windows 7

Windows 7 Professional
FJ82H-XT6CR-J8D7P-XQJJ2-GPDD4
Windows 7 Professional N
MRPKT-YTG23-K7D7T-X2JMM-QY7MG
Windows 7 Enterprise
33PXH-7Y6KF-2VJC9-XBBR8-HVTHH
Windows 7 Enterprise N
YDRBP-3D83W-TY26F-D46B2-XCKRJ
Windows 7 Enterprise E
C29WB-22CC8-VJ326-GHFJW-H9DH4
Windows 10

Windows 10 Professional
W269N-WFGWX-YVC9B-4J6C9-T83GX
Windows 10 Professional N
MH37W-N47XK-V7XM9-C7227-GCQG9
Windows 10 Enterprise
NPPR9-FWDCX-D2C8J-H872K-2YT43
Windows 10 Enterprise N
DPH2V-TTNVB-4X9Q3-TJR4H-KHJW4
Windows 10 Education
NW6C2-QMPVW-D7KKK-3GKT6-VCFB2
Windows 10 Education N
2WH4N-8QGBV-H22JP-CT43Q-MDWWJ
Windows Server 2016

Windows Server 2016 Standard
WC2BQ-8NRM3-FDDYY-2BFGV-KHKQY
Windows Server 2016 Datacenter
CB7KF-BWN84-R7R2Y-793K2-8XDDG
Windows Server 2016 Essentials
JCKRF-N37P4-C2D82-9YXRT-4M63B
Windows Server 2012 R2

Windows Server 2012 R2 Server Standard
D2N9P-3P6X9-2R39C-7RTCD-MDVJX
Windows Server 2012 R2 Datacenter
W3GGN-FT8W3-Y4M27-J84CP-Q3VJ9
Windows Server 2012 R2 Essentials
KNC87-3J2TX-XB4WP-VCPJV-M4FWM
Windows Server 2012

Windows Server 2012 Core
BN3D2-R7TKB-3YPBD-8DRP2-27GG4
Windows Server 2012 Core N
8N2M2-HWPGY-7PGT9-HGDD8-GVGGY
Windows Server 2012 Core Single Language
2WN2H-YGCQR-KFX6K-CD6TF-84YXQ
Windows Server 2012 Core Country Specific
4K36P-JN4VD-GDC6V-KDT89-DYFKP
Windows Server 2012 Server Standard
XC9B7-NBPP2-83J2H-RHMBY-92BT4
Windows Server 2012 Standard Core
XC9B7-NBPP2-83J2H-RHMBY-92BT4
Windows Server 2012 Multipoint Standard
HM7DN-YVMH3-46JC3-XYTG7-CYQJJ
Windows Server 2012 Multipoint Premium
XNH6W-2V9GX-RGJ4K-Y8X6F-QGJ2G
Windows Server 2012 Datacenter
48HP8-DN98B-MYWDG-T2DCC-8W83P
Windows Server 2012 Datacenter Core
48HP8-DN98B-MYWDG-T2DCC-8W83P
Windows Server 2008 R2

Windows Server 2008 R2 HPC Edition
FKJQ8-TMCVP-FRMR7-4WR42-3JCD7
Windows Server 2008 R2 Datacenter
74YFP-3QFB3-KQT8W-PMXWJ-7M648
Windows Server 2008 R2 Enterprise
489J6-VHDMP-X63PK-3K798-CPX3Y
Windows Server 2008 R2 for Itanium-Based Systems
GT63C-RJFQ3-4GMB6-BRFB9-CB83V
Windows Server 2008 R2 Standard
YC6KT-GKW9T-YTKYR-T4X34-R7VHC
Windows Web Server 2008 R2
6TPJF-RBVHG-WBW2R-86QPH-6RTM4

Activate The System (slmgr -ato)

KMS clients will automatically attempt to contact the KMS server every two hours to activate.
You can force a client to activate the following slmgr.vbs switch.
slmgr.vbs -ato

Windows 10

Windows 10 has the KMS key built in.
Use step 1 (to set the KMS server to kms.csx.private.cam.ac.uk)
 \windows\system32\slmgr.vbs -skms kms.csx.private.cam.ac.uk
and step 3 (activating the product using -ato)
  slmgr.vbs -ato

Checking The License Status

Viewing the system properties should tell you if the system is activated or not. You can also use slmgr -dlv to view detailed licensing status of a system.

Converting clients from MAK to KMS licensing/Issues with KMS

You need to tell Windows that it is going to activate using KMS rather than MAK. When you buy a copy of Windows from software sales you will get a MAK key as part of the paperwork, this is not the one to use. Every Vista and Server 2008 (non R2) volume license media has a pid.txt file found under \Sources. This contains the KMS key. Alternative KMS keys can be found in the Volume Activation Technical Reference, for links look at the end of the page.

Troubleshooting

For Server 2008 when using the pid key from the \Sources\pid.txt file you may see the following error after adding the key with -ipk
  • Run Slui.exe 0x2a 0xC004F015 to display error text
  • Error 0xC004F015
This error can be ignored. Run Slmgr -ato and the system should activate.
When using the commands above, you may get errors such as '0x800706BA The RPC server is unavailable' (which may indicate a network error but is often displayed as an unhelpful generic error message) or 'Error 0x800706BA occurred in connecting to server -ipk'. The following three points should be noted:
  • Check that you are logged in as an Administrator running an Administrative command prompt
  • In the cscript command itself try using a / instead of -
  • If the error is with the -skms command it may indicate a network error (failure to communicate on port TCP 1688 - due to this you cannot activate via Lapwing and may get error 0x4004F00C)
For a more detailed list of error codes and possible causes see Microsoft's How to troubleshoot Volume Activation error codes on Windows Server 2008 and Windows Vista-based computers at http://support.microsoft.com/kb/938450.

Microsoft Documentation

Full Microsoft documentation can be found at the Microsoft Technet site. Some Selected links can be found below.
Root page for Volume activation
Volume Activation Technical Reference

Monday 20 November 2017

SINGLE SIGN-ON (SSO) IMPLEMENTATION IN ASP.NET MVC

To start with any secured web application, the developer needs to work on the implementation of the authentication functionality. If any user needs to enter into multiple secured web application on same domain in .NET framework, he needs to login through each of those applications. Logging in a number of times can be avoided with Single Sign On (SSO) functionality.
 SSO is a functionality that allows to login once and access multiple web applications with same credentials.
For example – once the user enters a user name and password on Gmail, he will be able to access Google’s other web application like Google Plus, YouTube, Play store, etc., with same credentials without logging in again.

How SSO works:

When a user runs a page in an application that requires user base authentication, the application searches for a cookie (forms authentication cookie) in the http request, if it does not find the cookie, it redirects the current page to the login page.
When a user enters valid credentials and click “Login” button, the system validates the credentials in data storage and set the credentials in Thread.CurrentPrincipal.Identity.Name property in .NET framework, and create a cookie in Response, and redirects to the requested page.
If a user navigates to another page of the application, then browser sends the authentication cookie as it already has the cookie from the last response. The browser when gets the cookie, validates the cookie properties; if the cookie is not expired, then the browser will fetch the required information from the cookie and set the user name into the Thread.CurrentPrincipal.Identity.Name property in .NET framework.

Implement SSO in MVC:

Here we see the steps to implement SSO in MVC Application using .NET
1. Open visual studio, create three blank applications (SingleSignOn, ApplciationA & ApplicationB). SingleSignOn application is for login functionality and ApplicationA and ApplicationB are secured web applications.
2. The solution will look something like below:

3. Add a AccountController in SingleSignOn, It will contain the login functionality code.
4. Write login code or simple forms authentication code in the AccountController as below:
public class AccountController : Controller
{
// GET: Account
public ActionResult Login(string returnUrl)
{
if (Request.IsAuthenticated)
{
return RedirectToAction(“Index”, “Home”);
            }
            ViewBag.ReturnUrl = returnUrl;
            return View();
        }
        [AllowAnonymous]
        [HttpPost]
        [ValidateAntiForgeryToken]
        public ActionResult Login(string userName, string password, string returnUrl)
        {
            if (FormsAuthentication.Authenticate(userName, password))
            {
                FormsAuthentication.SetAuthCookie(userName, false);
                if (!string.IsNullOrEmpty(returnUrl))
                {
                    return Redirect(returnUrl);
                }
                else
                {
                    return RedirectToAction(“Index”, “Home”);
                }
            }
            else
            {
                ModelState.AddModelError(string.Empty, “Invalid Login Detials”);
ViewBag.ReturnUrl = returnUrl;
                return View();
            }
        }
    }
FormsAuthentication.Authenticate method will check the credentials and authenticate whether user name and password are correct or not. We can also validate username and password from SQL Server database or from any other Data Source.
5. Now we will add a login view and write html form in the login view for user login.
@using (Html.BeginForm(new { ReturnUrl = ViewBag.ReturnUrl }))
{
    @Html.ValidationSummary()
    @Html.AntiForgeryToken()
    <div class="form-group">
        @Html.Label("UserName")
        @Html.Editor("UserName")
    </div>
    <div class="form-group">
        @Html.LabelForModel("Password")
        @Html.Password("Password")
    </div>
    <input class="btn btn-primary" type="submit" value="login" />
}
6. Create a Machine Key tag into web.config under System.Web tag in SingleSignOn, ApplciationA and ApplicationB.
  <system.web>
     <machineKey validationKey="4B616C4E8BE5E18C3A1650939E88F3B0ED1AFC692919D7937DA68BBC552F04027DCF8BD31125E5E69094E1A4BA96731067BB57F0D3C34B63B9B03123703CD01A" decryptionKey="EC095D7743D3368F22FB7F482D9F41AA911922EC753515BB"   validation="HMACSHA384" decryption="DES" />
You can create your own machine keys through below steps:
  • Open IIS manager.
  • Select the website name from the left panel.
  • In the right panel, double click on Machine Key icon under Asp.Net settings and you will get below window:
  • Now click on Generate Keys button in the right pane to generate random machine keys.
7. Add forms authentication tag to web.config of SingleSignOn, ApplciationA and ApplicationB.
    <authentication mode="Forms">
       <forms name="SingleSignOnApp" loginUrl="http://localhost/SingleSignOn/Account/Login" timeout="525599" slidingExpiration="true">
        </forms>
     </authentication>
8. We are using local IIS  localhost/SingleSignOn to configure it. To run it right click on project, choose Properties menu and choose Web as below:
9. To test an SSO functionality, right click on Home Controller in both ApplicationA and ApplicationB. Add Authorize attribute on the top of Home Controller that will redirect the unauthenticated users to SingleSignOn login.

[Authorize]
 public class HomeController : Controller
 { 
   public ActionResult Index()
   {
     return View();
   }
 }
10. Right click on Action result, select Add View and add Index View for the HomeController in both ApplicationA and ApplicationB.
 @{
    ViewBag.Title = "Application-A Home";
}
<h2>Application-A Home</h2>
Welcome @User.Identity.Name
11. Now browse http://localhost/ApplicaitonA, it will automatically redirect to http://localhost/SingleSignOnAccount/Login?ReturnUrl=%2fApplicationA%2f.
12. Login using username and password. After successful log in, it will automatically redirect to http://2345/
13. Now try the same process for ApplicationB and browse http://4345/. You will see that it automatically logs in and redirect to ApplicationB.

Saturday 18 November 2017

Writing User Stories, Examples and Templates In Agile Methodologies

What is a user story

In Agile methodology ‘User Story’ is a unit of work that should be completed in one sprint. Smaller than that it’s a task, more than week(s) of work is Epic or Theme.
The agile recommendation is to break down a set of user stories into smaller ones, containable into a single sprint duration, or ideally, a user story shouldn’t last more than a week.
One thing to keep in mind is that some of the agile “best practices” are to avoid having child stories, it is not a good recommendation to have user story in nested hierarchy, as that is also hard to model with stickies on a whiteboard.
There are some tools providing support for nested hierarchy of user stories, but you should avoid it. Keep the stories as a flat list, all at the same level.

How to write a user story

As a ____, I want ___, so that ____
User Stories doesn’t need to be this format. The user story format is not a requirement of Scrum. but it helps to force the story writer to articulate those important three questions.
  • Who are we building it for, who the user is? — As a <type of user>
  • What are we building, what is the intention? — I want <some goal or objective >
  • Why are we building it, what value it bring for the user.? — So that <benefit, value>

User story Template

Having a template for a user story, provides a good guideline. It helps avoid common problems and pitfalls. With a template, you get to see what user role the story is for, what they want to be able to do, and why. Then you as PO and the developer[Team] get to figure out how to accomplish that. Engineers and POs do not use the same language/not understanding each other. This template force some a common principle and help to understand what should be written to be understood well by both parties
User story template describes both the requirement and the value to the stakeholder. There is no specific format for defining a user story in agile, agile doesn’t force any kind of template for a user story.
The concept of writing a user story is to start a conversation around the story, and the mutual understanding that we try to build, the value we want to offer to a user and how the user will utilize it.
Do not write a user story for the sake of writing it. People tend to think that they’re done with writing a user story when they managed to fill in the blanks in the template, but someti it just doesn’t fit.
This is a very bad example of user story and agile world is full of these user stories
As a user, I am able to able to provide best support service to my customer.

Practical example of user story Template

Screenshot bellow is the real story from our sprint, it is shown as is without any modification, idea is to show how we are using agile and what is our template of user story look like.
User story bellow is a result of feedback we receive from a customer, 80% of the sprint content is based on direct feedback from customers.

user story

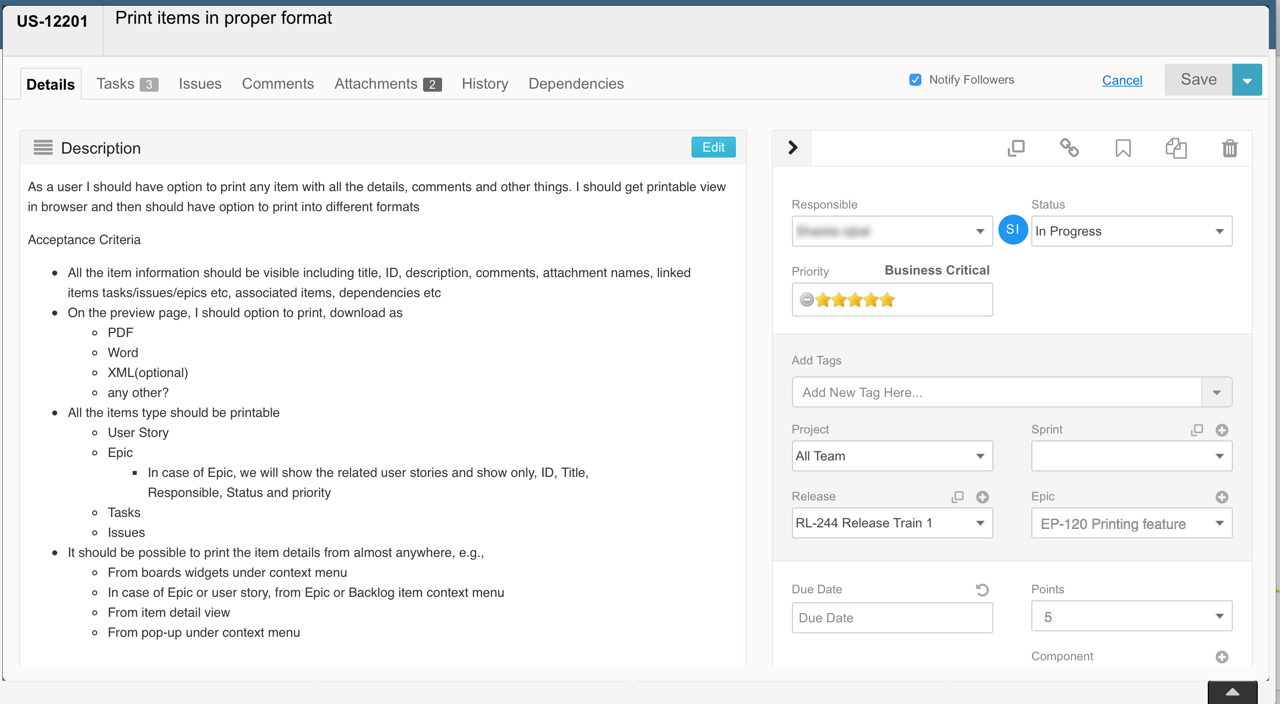
Our prioritization is based on the value proposition for the requested feature or feedback.

example.

User story title: Customer withdraws cash.

As a customer,
I want to withdraw cash from an ATM
So that I don't have to wait in line at the bank.

Acceptance Criterion 1:

Given that the account is creditworthy
   And the card is valid
   And the dispenser contains cash,
When the customer requests the cash
Then ensure the account is debited
   And ensure cash is dispensed
   And ensure the card is returned.

Acceptance Criterion 2:

Given that the account is overdrawn
   And the card is valid,
When the customer requests the cash
Then ensure the rejection message is displayed
   And ensure cash is not dispensed.

How we receive user stories

We are in direct contact with customers via phone call, skype, twitter, email, uservoice and real-time chat[intercom.io] . We instantly forward the email to our Yodiz project. In Yodiz you can create user story, issue and epic via email, please check the link here.

Why you should write a user story

As a Product Owner (PO) when you receive a user story from any source you should be asking yourself following questions
1) Why are we doing this, what is the business or technological gain?
2) What is it for, who will be user actually using it, remember the 80/20 rules ?. If you are spending too much effort on providing the feature which is either not requested by many users, or doesn’t add much value.
3) What value does it drive, what is monetary, user, or UX gain of that user story?
4) what’s your estimates on time to implement?
5) what are the acceptance criteria or CoS (condition of satisfactions)?
6) what testing will be needed?
7) What support can you give?
8) what is your marching order, does the story fit well in the marching order?
Product owner and the team should decide on what they feel is the most appropriate way to describe the work that needs to be done. As team know how part and PO knows the what part

What user story is really for

User Story is only meant to describe a feature, but not describe how to implement it, meaning leaving out the technical aspect, it should describe the behavior or flow from user’s perspective.
A user story is basically a use case. What do your users need the software to actually do? A story should be a unit of work that a team commits to in a sprint. Whether or not that unit requires subtasks should be up to the team.

Story points for user story estimation

Sizing of the story point of early adaptors of the scrum, as sometimes a story will be small enough if we do too much slicing vertically, other time it get way too bigger, as we keep on stuffing the feature in one single user story.

Reason of having story point

This is why we have story points. The points are a fuzzy measurement of how big or small a story is, and should be estimated by the engineer(s) who are implementing it or someone with superior knowledge about the work. In organization/team there should have a standard scale for story points measure, so you can compare multiple stories and say and have some reference like you are able to say that those seem like a similar amount of work like that user story.
More often used is Fibonacci numbers, which is fairly standard. The points don’t really “mean” anything, though, they don’t equate to the amount of time spent or effort for implementation, its simple way of calculating a relative complexity or measuring to get to point A to point B.

Definition of Done (DoD), Acceptance Criteria or Condition of Satisfactions (CoS)

As you fine-tune your estimation, the team should be able to reliably pick up as many stories as they can handle. If your process is working well, that number will probably slowly increase over time, but it take 5–10 sprints to master this technique.
You must define your Definition of Done (DoD) for stories, acceptance criteria or condition of satisfaction (CoS ) . This helps set expectations within the team as to when a team should consider something done. It also help to write detail level of test cases other advance of writing CoS, DoD or acceptance criteria is, you force yourself to think like an end user. What comes out of this approach is much different than writing user story as a PO

Characteristics of a User Story

  • A story should be complete and big enough to provide a user with some value. The user story should be user-centric, normally people write user story which is too much centric around component or system aspect, when writing a user story, we should focus on what the user is doing or getting out of the story.
  • The goal is that when the user story is done, the user can do something of value to them.
  • Group user stories which offer a feature in the same domain, or its good to group a certain feature or use case into a single Epic or even multiple Epics. Ideally you’ll break up your features in a way that you can launch into production parts of the feature independently from the whole, but its not always possible.

Grouping user stories

Epic is simply a story that is too big to fit into a single sprint or too complex to estimate. To cut off or slice horizontally a bigger story/epic, is highly dependent on the team itself. Not all stories necessarily need to fit under an epic
Once something you find which is above the threshold of a user story, it should be broken down into more manageable chunks.
Epics are like chapters in books, themes are like a collection of books on the same topics, while the project is a library which contain all those books.

User story grooming session

It is highly recommended to go through the user stories with a group of stakeholder and some of the team members. It help to describe what’s needed in order for the item to be ready for development and to which priority.
Sprints are meant to allow you to deliver finished parts of the end product. As simple as they may seem, it requires a proper planning, it require to have perfect input and need to specify acceptance criteria.
How to run grooming session for the user stories.
  1. Send a recursive invitation for grooming session. Depending on your sprint duration, if you are having two long sprints then it’s ideal to have grooming session every month or every two week, it should while sprint is in the middle.
  2. Prioritize the backlog as good as you can, ask the participants to through the userstroies before coming to meeting, so there can be a detail level of discussion
  3. You can invite people from technical team, not all members need to be there, but some senior memebers, architect or someone with good knowldlege about the user story in quesiton should be invited, then there should be people from business, sales or stakeholders, the internal customer they people who requested those user stories.
  4. It is important to run the meeting as timebox for 1 hours, more then that its waste of time, you can have biweekly shorter meeting, its not a good idea to spend 3 hours for grooming session, as its not very productive.
  5. Go through the user stories in detail, try to finalize the open questions, perfect your mokups and describe and verify your user flow.
  6. If budget is available order the lunch or coffea/cake
  7. Take meeting notes and write clear action points like what to be updated by who, etc

INVEST

Last but not least, we can not close the discussion about user story without mentioning the INVEST
Slice horizontally the user stories by using INVEST acronym
  • Independent — Can the story stand alone by itself ?
  • Negotiable — Can this story be changed or removed without impact to everything else?
  • Valuable — Does this story have value to the end user?
  • Estimable — Can you estimate the size of the story?
  • Small —Is it small enough?
  • Testable — Can this story be tested and verified?

Conclusion

How you write a user story, what is the most difficult thing to overcome when writing a user story.

Recent Post

Parallel Task in .Net 4.0