
To start with any secured web application, the developer needs to work on the implementation of the authentication functionality. If any user needs to enter into multiple secured web application on same domain in .NET framework, he needs to login through each of those applications. Logging in a number of times can be avoided with Single Sign On (SSO) functionality.
SSO is a functionality that allows to login once and access multiple web applications with same credentials.
For example – once the user enters a user name and password on Gmail, he will be able to access Google’s other web application like Google Plus, YouTube, Play store, etc., with same credentials without logging in again.
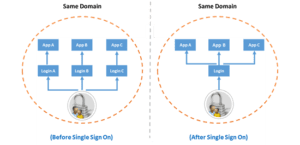
How SSO works:
When a user runs a page in an application that requires user base authentication, the application searches for a cookie (forms authentication cookie) in the http request, if it does not find the cookie, it redirects the current page to the login page.
When a user enters valid credentials and click “Login” button, the system validates the credentials in data storage and set the credentials in Thread.CurrentPrincipal.Identity.Name property in .NET framework, and create a cookie in Response, and redirects to the requested page.
If a user navigates to another page of the application, then browser sends the authentication cookie as it already has the cookie from the last response. The browser when gets the cookie, validates the cookie properties; if the cookie is not expired, then the browser will fetch the required information from the cookie and set the user name into the Thread.CurrentPrincipal.Identity.Name property in .NET framework.
Implement SSO in MVC:
Here we see the steps to implement SSO in MVC Application using .NET
1. Open visual studio, create three blank applications (SingleSignOn, ApplciationA & ApplicationB). SingleSignOn application is for login functionality and ApplicationA and ApplicationB are secured web applications.
1. Open visual studio, create three blank applications (SingleSignOn, ApplciationA & ApplicationB). SingleSignOn application is for login functionality and ApplicationA and ApplicationB are secured web applications.
2. The solution will look something like below:

3. Add a AccountController in SingleSignOn, It will contain the login functionality code.

4. Write login code or simple forms authentication code in the AccountController as below:
public class AccountController : Controller
{
// GET: Account
public ActionResult Login(string returnUrl)
{
if (Request.IsAuthenticated)
{
return RedirectToAction(“Index”, “Home”);
{
// GET: Account
public ActionResult Login(string returnUrl)
{
if (Request.IsAuthenticated)
{
return RedirectToAction(“Index”, “Home”);
}
ViewBag.ReturnUrl = returnUrl;
return View();
}
[AllowAnonymous]
[HttpPost]
[ValidateAntiForgeryToken]
public ActionResult Login(string userName, string password, string returnUrl)
{
if (FormsAuthentication.Authenticate(userName, password))
{
FormsAuthentication.SetAuthCookie(userName, false);
if (!string.IsNullOrEmpty(returnUrl))
{
return Redirect(returnUrl);
}
else
{
return RedirectToAction(“Index”, “Home”);
}
}
else
{
ModelState.AddModelError(string.Empty, “Invalid Login Detials”);
ViewBag.ReturnUrl = returnUrl;
return View();
}
}
}
FormsAuthentication.Authenticate method will check the credentials and authenticate whether user name and password are correct or not. We can also validate username and password from SQL Server database or from any other Data Source.
5. Now we will add a login view and write html form in the login view for user login.
@using (Html.BeginForm(new { ReturnUrl = ViewBag.ReturnUrl }))
{
@Html.ValidationSummary()
@Html.AntiForgeryToken()
<div class="form-group">
@Html.Label("UserName")
@Html.Editor("UserName")
</div>
<div class="form-group">
@Html.LabelForModel("Password")
@Html.Password("Password")
</div>
<input class="btn btn-primary" type="submit" value="login" />
}
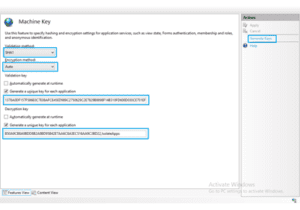
6. Create a Machine Key tag into web.config under System.Web tag in SingleSignOn, ApplciationA and ApplicationB.
  <system.web>
     <machineKey validationKey="4B616C4E8BE5E18C3A1650939E88F3B0ED1AFC692919D7937DA68BBC552F04027DCF8BD31125E5E69094E1A4BA96731067BB57F0D3C34B63B9B03123703CD01A" decryptionKey="EC095D7743D3368F22FB7F482D9F41AA911922EC753515BB"   validation="HMACSHA384" decryption="DES" />
You can create your own machine keys through below steps:
- Open IIS manager.
- Select the website name from the left panel.
- In the right panel, double click on Machine Key icon under Asp.Net settings and you will get below window:

- Now click on Generate Keys button in the right pane to generate random machine keys.
7. Add forms authentication tag to web.config of SingleSignOn, ApplciationA and ApplicationB.
    <authentication mode="Forms">
       <forms name="SingleSignOnApp" loginUrl="http://localhost/SingleSignOn/Account/Login" timeout="525599" slidingExpiration="true">
        </forms>
     </authentication>
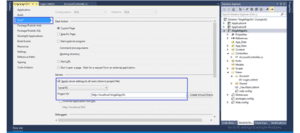
8. We are using local IIS localhost/SingleSignOn to configure it. To run it right click on project, choose Properties menu and choose Web as below:
9. To test an SSO functionality, right click on Home Controller in both ApplicationA and ApplicationB. Add Authorize attribute on the top of Home Controller that will redirect the unauthenticated users to SingleSignOn login.
[Authorize]
 public class HomeController : Controller
 {
   public ActionResult Index()
   {
     return View();
   }
 }
10. Right click on Action result, select Add View and add Index View for the HomeController in both ApplicationA and ApplicationB.
@{
ViewBag.Title = "Application-A Home";
}
<h2>Application-A Home</h2>
Welcome @User.Identity.Name
11. Now browse http://localhost/ApplicaitonA, it will automatically redirect to http://localhost/SingleSignOnAccount/Login?ReturnUrl=%2fApplicationA%2f.
12. Login using username and password. After successful log in, it will automatically redirect to http://2345/
13. Now try the same process for ApplicationB and browse http://4345/. You will see that it automatically logs in and redirect to ApplicationB.

No comments:
Post a Comment