Here, you will learn how to create a new ASP.NET Web API project using Visual Studio.
You can create a Web API project in two ways.
- Web API with MVC Project
- Stand-alone Web API Project
Web API with MVC Project:
Visual Studio 2013 for Web includes Web API template which creates a new Web API project with ASP.NET MVC application and includes all the necessary references to get started.
For this, open Visual Studio 2013 for Web and click on File menu and click on New Project. This will open New Project popup as below.

In the New Project popup, expand Visual C# and select Web node in the left pane. Select ASP.NET Web Application template in the middle pane and enter the name of a project and click OK.
This will open New ASP.NET Project popup as shown below.
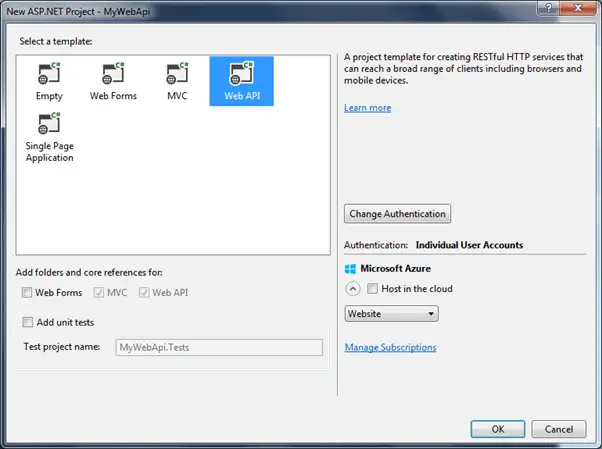
Select Web API in the above popup. Notice that this has selected and disabled MVC and Web API checkboxes. It means that it will add necessary folders and references for both MVC and Web API.
Click Ok to create a new Web API + MVC project as shown below.

This project is same as default MVC project with two specific files for Web API, WebApiConfig.cs in App_Start folder and ValuesController.cs in Controllers folder as shown below.
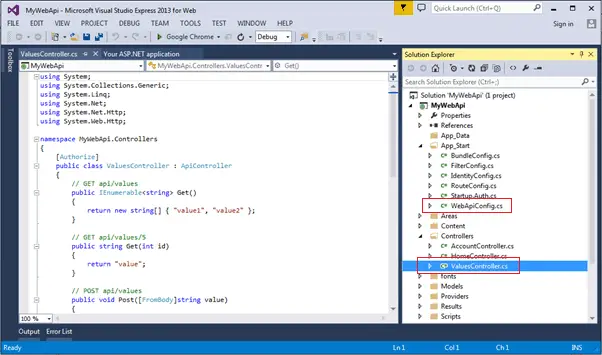
The WebApiConfig.cs is configuration file for Web API. You can configure routes and other things for web API, same like RouteConfig.cs is used to configure MVC routes. It also creates Web API controller ValuesController.cs by default. You will learn about WebApiConfig and Controller in the next section.
Thus, you can create Web API project with MVC to get started on your application.
Stand-alone Web API Project:
Here, we will create a new stand-alone Web API project without MVC project.
For this, open Visual Studio 2013 for Web -> go to File menu and select New Project.. This will open New Project popup as below.

Select Web template in the left pane and ASP.NET Web Application in the middle pane. Enter a name of the project, location and Solution name as shown above. Clicking on OK will open a popup as shown below.
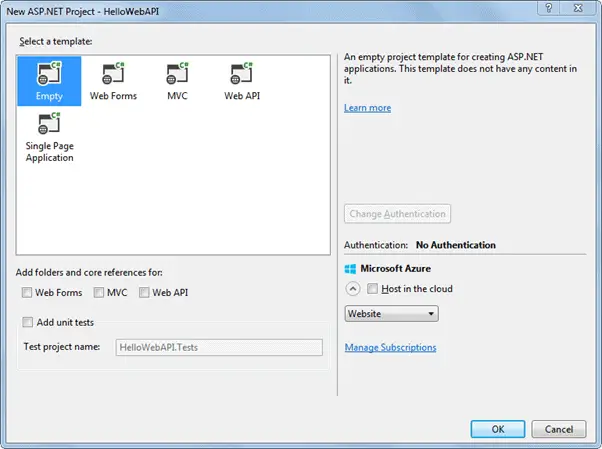
In the above popup, select Empty as a template and click ok. This will create an empty "HelloWebAPI" project.
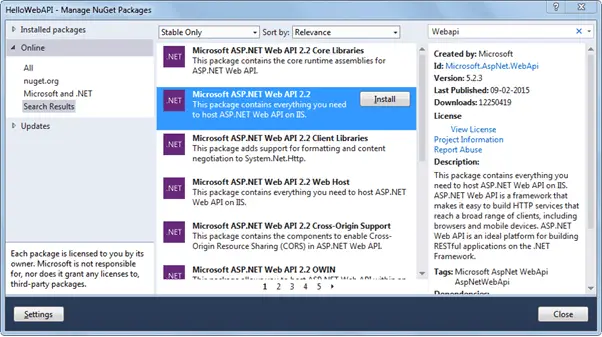
Now, we need to add latest Web API references using NuGet Package Manager. Right Click on the project and click Manage NuGet Packages.. as shown below.

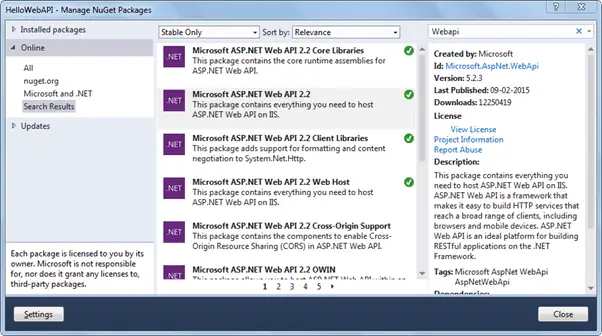
This will open Manage NuGet Packages popup. Select Online in the left pane and search for webapi (make sure that internet connection is on). This will display all the Web API related packages. Select Microsoft ASP.NET Web API2.2 package and click on Install as shown below.
Accept the license agreement and continue.
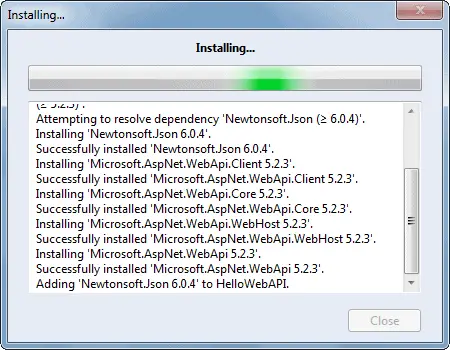
The following Web API packages are displayed upon successful installation.
Now, create Controllers and Configuration folder in the HelloWebAPI project as shown below. We will add Web API controller in the Controllers folder and configuration class in the Configuration folder.

Now, add a new class in the configuration folder and name it "HelloWebAPIConfig" with following content. (You may give any appropriate name)
Example: Web API Configuration
using System;
using System.Collections.Generic;
using System.Linq;
using System.Web;
using System.Web.Http;

namespace HelloWebAPI.Configuration
{
    public static class HelloWebAPIConfig
    {
        public static void Register(HttpConfiguration config)
        {
            // Web API routes
            config.MapHttpAttributeRoutes();

            config.Routes.MapHttpRoute(
                name: "DefaultApi",
                routeTemplate: "api/{controller}/{id}",
                defaults: new { id = RouteParameter.Optional }
            );
        }
    }
}
Now, add Global.asax by right clicking on the project -> select Add -> click New Item.. to open Add New Item popup as below. Select Global Application Class and click OK.

This will add Global.asax file into the project. We need to configure our Web API routes when application starts. So call HelloWebAPIConfig.Register() method in the Application_Start event in the Global.asax as shown below.
Global.asax
public class Global : System.Web.HttpApplication
{
    protected void Application_Start(object sender, EventArgs e)
    {
        GlobalConfiguration.Configure(HelloWebAPIConfig.Register);
    }
}
Web API is configured only using code based configuration using GlobalConfiguration class. The Configure() method requires a callback method where you have configured your Web API.
Thus, when application starts it will call Application_Start event which in turn calls HelloWebAPIConfig.Register() method to configure your Web API.
Now, let's add Web API controller by right clicking on the Controllers folder -> select Controller.. this will open popup as below.
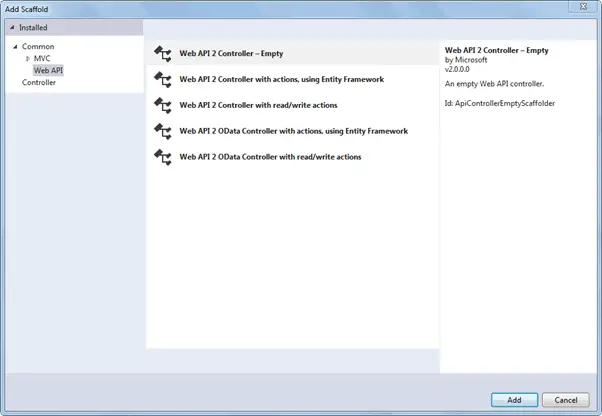
Select Web API in the left pane and Web API 2 Controller - Empty in the middle pane and click Add. This will open another popup to enter a name of your controller as below. Enter controller name and click Add.

This will create following empty HelloController class in Controllers folder.
Example: Web API Controller
using System;
using System.Collections.Generic;
using System.Linq;
using System.Net;
using System.Net.Http;
using System.Web.Http;

namespace HelloWebAPI.Controller
{
    public class HelloController : ApiController
    {

    }
}
Now, we need to add action methods. Here, we will add simple Get action methods as shown below.
Example: Web API Controller
using System;
using System.Collections.Generic;
using System.Linq;
using System.Net;
using System.Net.Http;
using System.Web.Http;

namespace HelloWebAPI.Controller
{
    public class HelloController : ApiController
    {
        public string Get()
        {
            return "Hello World";
        }
    }
}
Now, compile and run the project and navigate to
http://localhost:xxxx/api/hello in the browser. It will display following result. (replace xxxx with your local port number)
So in this way you can create a simple Web API from scratch with config and controller class.
During the development, programmers often need to test and check the result of Web API. Learn how to test Web API for development in the next section.

No comments:
Post a Comment